On the way to needleweaving

June 8, 2009

Hemstitching is my normal preparation for needleweaving. On the way to doing this preliminary work for Sharon b‘s May Stitch Explorer, I was sidetracked by substitutes. All sorts of thoughts about other stitches that could gather threads began to swirl about in my mind. Here is a quick look at some stitches I’ve been trying.

A sorbello variation, I think. If it’s some other stitch whose name I forgot, please let me know. I will correct it.

060709sorbello

060709sorloop

double back stitch 
This has created a raised ridge, unfortunately not detectable in this photo.

060709backstitch

feather stitch

060709feather

As you can see I double wrapped some of the stitches to gather the threads of the ground fabric more tightly. I didn’t do this in all the experiments. And the decision to go to the double wrap seems to me to be based more on the ground used than the stitches. All my first experiments are cream on cream and didn’t seem to lend themselves to good photos for explanation.


Patterns on padding

May 31, 2009

Sharon b’s April SE challenge is on Casalguidi and somewhere in my research about this type of embroidery I read that the chain stitch was occasionally used to cover the padding. At the time I read it, I didn’t mark it or think much about it. It was only after doing the tassel pictured in the last post that I remembered it again.

The tassel had sparked my imagination, I took it off grid and began playing with a few ideas. Here is one of those doodles.

053109e

To the lower right, I tried areas of coverage alternating with areas of no coverage. On the spiral (top center) there are three stitches used to cover the padding. And on the lower left, I use patterns in the foundation stitches for the raised stem stitches.

Taking these ideas into an on grid mode, the following are my school girl exercises:

chain stitch

053109f

buttonhole stitch

053109g

a knotted stitch

053109d

And as you may detect, the first and last rows of this were knotted on every foundation stitch but in between I alternated and knotted every other one. I saw what started out as a practicality to keep the coverage as close and dense as possible became another way to create a pattern on the padding. So I tried some more with the more traditional raised stem stitch for Casalguidi.

053109c2

The last of the school girl exercises was the change in the foundation stitches. These are worked on a foundation laid out in a triangular pattern.

053109h

The last photo is a close up the area in the doodle where I used a pattern of two close foundation stitches followed by a larger space in a repeating pattern.

053109i

That concludes the photos on one of the wandering trails I took in trying to explore  Casalguidi. I have photos I’d like to put together for one more post on the subject before I start posting some work on the May SE challenge and other things I’ve been doing. I appreciate all those who are reading the very erratic posts I’m making these days. Thank you. Many thanks, as well, to those who continue who visit the QM blog in between times.


Late and all thumbs

May 26, 2009

I feel like I’m all thumbs pulling together a post on the work I’ve done on Sharon b‘s April Stitch Explorer. And late…that is putting it mildly.

Here’s some of the fun I had. Given the limited time I’ve had in the last month or so, I didn’t touch the pulled stitch background. I took this opportunity to work on the padded raised stitches of Casalguidi as an extension of last year’s work with raised stitches.

051509a

Raised edges with a very flat center by catching the stem stitches into each other. It would have been fun to see how a large bead or marble in the center would have changed this.

051509b

Using felt rather than thread to bring various levels of padding to the raised stem stitches. 

051509c

Waste canvas ground–a quick imitation of a pulled work background.

051509d

Experiments with increase and decrease of  padding width and height.

051509f

Fringe or tassel

051509g

Raised stem stitches with Parma braid stitching as padding. This makes a squared line rather than the rounded one of the traditional Casalguidi.


Thoughts on Assisi embroidery

April 5, 2009

I’ve been delighting in the Assisi embroidery I’ve seen popping up on various blogs around the on-line needlework community. I’ve been thinking more than stitching on this third month in Sharon b‘s Stitch Explorer challenge. And everything I have been stitching has been in miniature to try and explore those ideas more quickly.

This first sample is a little larger than two quarters and not a very successful experiment. I was attempting to choose a stitch for the background that might remind one of the texture of the the void object. The thread I used was not covering well enough and I had difficulty with the compensation stitches.

040509a

However, I liked the stitch. It is worked as a herringbone stitch (see photo below). After stitching the first row the fabric is turned one hundred and eighty degrees and another herringbone row is worked directly below it. This pattern is kept through out the stitching.

040509b

Another aspect of Assisi embroidery I’ve been thinking about is lettering. I worked with printing at a time when reverse print was gaining popularity in the industry that I was involved in. I’m not sure about the history of any relationship between the embroidery and reverse print, but I wanted to experiment with a couple of things. These are mainly experiments about creating an illusion of depth. The top left uses Perle 8 cotton, silk floss and 100/3 silk with cross stitch and backstitching. The rest are Perle 12 cotton with long armed cross stitching.

The top two seem to work more readily. The right being unembellished. The left the attempt to do things to increase the depth at which the letter appears. The bottom two need some distance to work. The one on the right works best in the last photo, I think. Perhaps the one on the left doesn’t work at all, but I have few more tests to make and perhaps I’ll get the effect I’m looking for. 

040509c

040509d

040509e

I hope regular readers will excuse the erratic or non-existent posting patterns in the past couple of months. I’m working hard on color studies and work is taking up more hours recently. I’m doing some non-postable stitching, too. I don’t suppose I could stop stitching without feeling a sense something missing in my day.


Green Tea: first experiments with Assisi embroidery

March 17, 2009

Green tea and Assisi work might not mix in your mind but this design below was my first attempt at doing some innovations with this style of embroidery. And why did the name “Green Tea” stick? Who knows?

031809a

I suppose anyone who loves blackwork as much as I do would experiment with Assisi embroidery sooner or later. The design is based on a nine patch and evolved from there. I kept the traditional flavor by using a darker thread to outline the image in the four corners and center.

A lighter thread was used as the background fill and done in a slanted gobelin stitch. Rather than working these stitches left to right across the design, they radiated out from the center. Then another motif was created in the background color in the center of each side. Here the outlining was done in the background thread to keep it from competing with the first motif. The five dots of that second motif are probably rice stitches. This was an attempt to add a subtle perk to the dullness of the background. 

I definitely see some errors and lessons learned in this piece. But I still like the concepts in Assisi embroidery that I was playing with and dreaming over a few years ago.  My hope is that Sharon’s challenge will stir up more thoughts on this fascinating style of embroidery and that we can encourage and inspire each other along the way.

I am still working through comments and appreciate the kindness of so many who not only swing by visiting the blog but also comment. I have received inquiries about how the trellis stitch work was managed around the motif pictured in the last post. It is hard for me to put into words. But anyone interested may use the link to see the addition to that post. I warn you in advance, there are only words and unfortunately no photographs to cover the subject.


Trellis stitches to Assisi: soft transition

March 16, 2009

On March 15, Sharon b announced the third Stitch Explorer challenge. She has posted wonderful examples of  her own innovative work with the concept of Assisi embroidery along with the details and references to the traditional work.

As I read through Sharon’s post a small idea came to mind and I decided to make a soft transition from the trellis stitches of the second Stitch Explorer to the Assisi embroidery of the third challenge.

031509b

The workmanship is lacking as I was using some thread I’m not skilled with but the concept is very workable and it was a fun exercise. Below is a photo attempting to give a sense of the difference in height between the ground and the trellis stitches.

031509ah

If you haven’t considered getting involved with Sharon’s Stitch Explorer challenge, please do look into it. Sharon has posted details about it here. If you’d like to see what others are doing, continue to check for comments in Sharon’s posts and there is a flickr group.

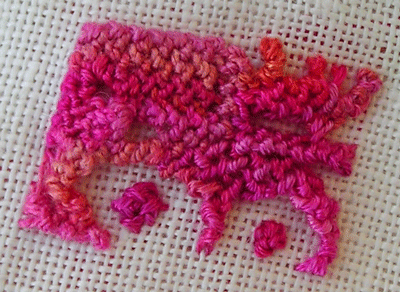
Before leaving the trellis stitch completely behind. I wanted to show one more of the samples I’d not yet posted. Doing some off grid work led to some trials without anchoring the stitches to a stitched line. Using an anchored thread to attach the beginning row of stitches gave me more freedom and ability to manipulate the line freely after stitching. It could be joined with other lines at will or remain isolated.
031509c

When I was finished with the little doodle, it looked to me as if somone with a wrinkled brow was peeking out of a window.

Update:

Many thanks for kind comments about this post. I have also received inquiries about how the trellis stitch work was managed as I worked around the motif pictured this post. It is hard for me to put into words. I’m sorry that there are no pictures just words as I’d not thought about photographing as I went along.

This is my best attempt to explain what I did. There may be much better ways to handle it. I’m no expert in stump work. Perhaps others may be able to help and know how to do it more easily. If so, please feel free to add a comment. I would appreciate learning more.

I started stitching the trellis stitch along one of the outer, non-diagonal sides. I stitched until I came to a place where the stitching would overrun the outline of the motif. In that row I anchored it where ever it met the motif’s outline. When that row was completed, I worked only back on it until the stitching meet the motif’s outline and went back and forth between the outside edge of the motif and the outer design outline. When that stitching came even with the last of the motif’s outline and the stitching could once again go across the design to the inside of other outer edge without covering the motif, I paused the stitching.

Next, I took up the outline of the other side in the same manner picking up on the last row of completed stitching on that side and so forth. When stitching on that side cleared the last of the motif’s outline I paused that stitching, too. I then took up the lower center “V” shape and worked from the point to the place it also cleared the motif’s outline and paused the stitching. I worked then worked next row completely across the design and catching in the stitching that had been paused and anchoring it to the motif’s outline where needed.

The only thing remaining for me was to pick up the stitching paused over the upper “V” shape and fill in that shape working towards the point. I’m sorry to use so many words, it is much easier done than read.


Trellis stitches in blue question marks and green volcanos

March 13, 2009

Blue question mark in the trellis stitch.

031309b

The green volcano

031309a

Centering in

031309c

Directed outward

031309f

An experiment with the trellis stitch, stretching trianglar shapes.

Rotary power

031309g

An experiment with the spiral trellis stitch, running stitch base.

Lateral movements

031309h

An experiment with the trellis stitch, running stitch base.

One other experiment in a post soon.

Many thanks for the kind comments especially those concerning Anne’s flower.  I will try to catch up in replying to all the comments shortly. Many thanks to everyone as always for visiting the QM blog. 


Trellis stitching: friends, thoughts and reflections

March 1, 2009

My friend, Anne Gailhbaud, in France emailed me the most delightful scan of a flower she made using the spiral trellis stitch. I love the contrast between the center and the petals of this flower. And I asked if I could share this photo on my blog and she graciously allowed me to do it. Please keep in mind that the scanning squashed the stitching  to some extent, but I think much of the beauty remained.

ruban1

If you aren’t familiar with Anne’s work please do take time to swing by her website. She does many other types of embroidery, beading and other hand work.

Many thanks to Anne for her willingness to share photos of her work so frequently. She is doing so much more with this stitch, too. And I’ve been seeing other wonderful things so many stitchers are doing as I travel the web.

A few of the blogs I read have been involved in the “Today’s Title is…”.  This challenge grabbed my attention with the first title, blue chair, because of the immediate a memory that flooded in. My grandfather’s chair at the supper table was painted blue. From there he presided over a lively table. He loved to tip back in his chair when he was finished eating. I think over the years it became a standing joke with my grandmother about how far he could lean before gravity overcame him and the chair. I never heard about any crash, but my grandmother continued to express her concern for his safety. And from that chair, as others were washing up the dishes and things were tidied up in the kitchen, my grandfather would read aloud a book or pieces from the newspaper in his strong, clear voice with the Vermont accent.

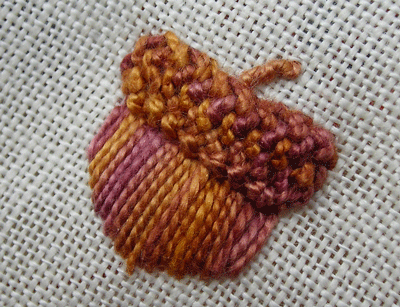
But I’ve digressed, back to trellis stitch–one of the other titles in the challenge has been ‘meeting of opposites’. And it brought to mind the acorn. I assume that in the past embroiderers may have used the trellis stitch with the satin stitch to illustrate the meeting of opposites found in the acorn. I can still remember my fascination with the little acorns; the caps so rough and dull and the hulls satiny smooth and shinny with sharp little points at the bottom. I had to try one.

022809d

Practice does help with this stitch. I tried the trellis stitch on the diagonal and you can see the first stitching on the upper triangle in comparison to the second trial on the lower triangle. The diagonal stitching is not needed, the shape would more traditionally be filled horizontally.  But it was just a fun challenge for me.

022809b1

This last photo about contrast is one I noticed while working on editing the spiral trellis stitch flower photos. 

022809a

Do you see the shadow? Most of my embroidery doesn’t cast much of a shadow. Perhaps that’s why I’m having so much fun with these spiral trellis stitches.

Many thanks to Sharon b for Stitch Explorer’s February challenge. It is half over. I haven’t done half the things I’ve thought of. I’d love to see more headway on this stitch before March 15 arrives.


Trellis stitch lines

February 23, 2009

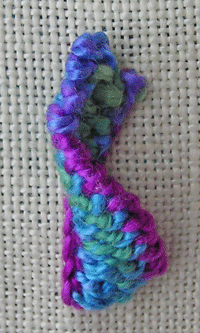
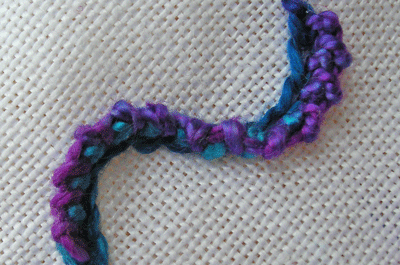
In new work with the trellis stitch I’ve mostly been concentrating on lines rather than shapes. Although I will admit that there is one shape sample at the end of this post.

022309aDifferent view, same sample. Tacked to twist.
022309b

Leaning in opposite directions around the curves.  

022309i

A graduated stretch.

022309g

For some reason I got excited about this line experiment with the trellis stitch below and it lead to the other experiments with lines that became a rather jumbled mess in the photo following.

022309e

A jumble of lines.

022309d

The most exciting part to me was the upper left corner where the lines have various heights and angles.

My flower using the reverse chain stitch as the base  for the center and making petals. The petals are done in two different colors to show the way I began to develop them. I’ve tried a few completely detached from each other as well as a few other experiments. More in the next post.

022309j


Trellis stitch: out and about

February 22, 2009

Just taking a moment to point out some exciting things happening with the trellis and spiral stitches due to Sharon b‘s February Stitch Explorer challenge.

Annie at Annies Crazy World has been doing wonderful things–a tree, a cup and saucer and a hat. The hat is darling and she’s issued an invitation to others to make and decorate trellis stitch hats. I’m looking forward to seeing all that will come out of that invitation. And hope everyone who makes one will link back to Annie’s post. And if you haven’t seen Annie’s recent series on the feather stitch please do take time to look through that as well.

Annet at Fat Quarter has also been doing great things in adapting the stitches to various shapes.

Another of my favorite sightings on the trellis stitch is a leaf that Conni at The Scoop, Score and Deal made. She’s been working on felt and has made a fun flower, too.

More comments keep popping up on Sharon’s post from others involved in the challenge, so please do keep looping back there to see what new works are being done with the trellis and spiral trellis stitches. They are fascinating stitches. If you haven’t been involved in the challenge yet please consider it. Sharon’s explains it here.